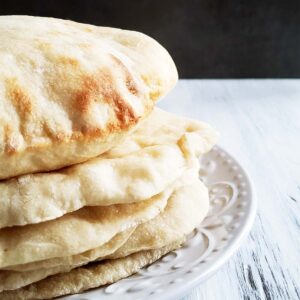
This Sourdough Discard Pita Bread is so easy to make and requires just a few basic ingredients that you probably already have on hand.
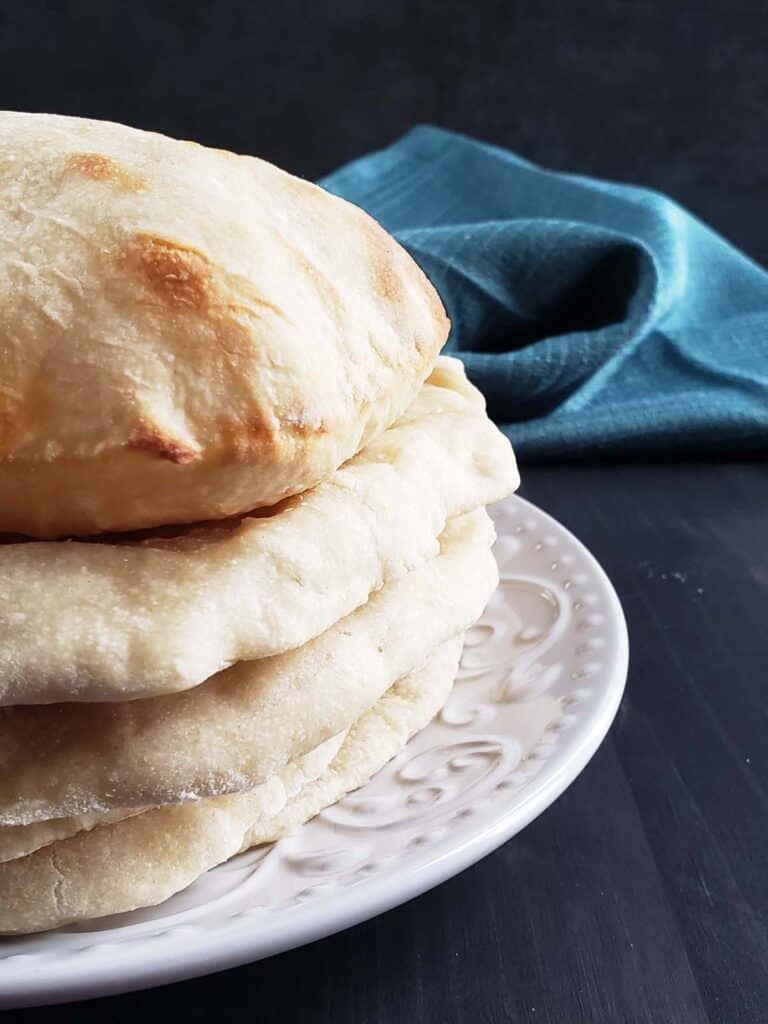
To make sourdough pita bread all you need to do is mix up this simple dough, let it rise, roll it out, bake it, and enjoy your freshly made pita bread.
When it is baked homemade pita bread puffs up creating an open pocket in the middle that is perfect for stuffing with a variety of fillings.
Jump to:
Why You Will Love This recipe
- It's fun and so satisfying to watch your homemade pita bread puff up like a balloon in the oven.
- They taste amazing! So much better than the dry flavorless pita bread sold at the grocery store.
- It's a great way to use up extra sourdough discard.
Need some more sourdough discard recipes? Try one of these: Sourdough Tortillas, Baked Sourdough Chicken Tenders, Sourdough Dutch Baby, Sourdough Blueberry Scones, Sourdough Cheese Scones, Sourdough Oatmeal Pancakes, and Sourdough Pumpkin Bread.
Want to reduce your sourdough discard? I recommend trying this No Waste Sourdough Starter Method.
Recipe Ingredients
You will need the following ingredients to make this Sourdough Discard Pita Bread.
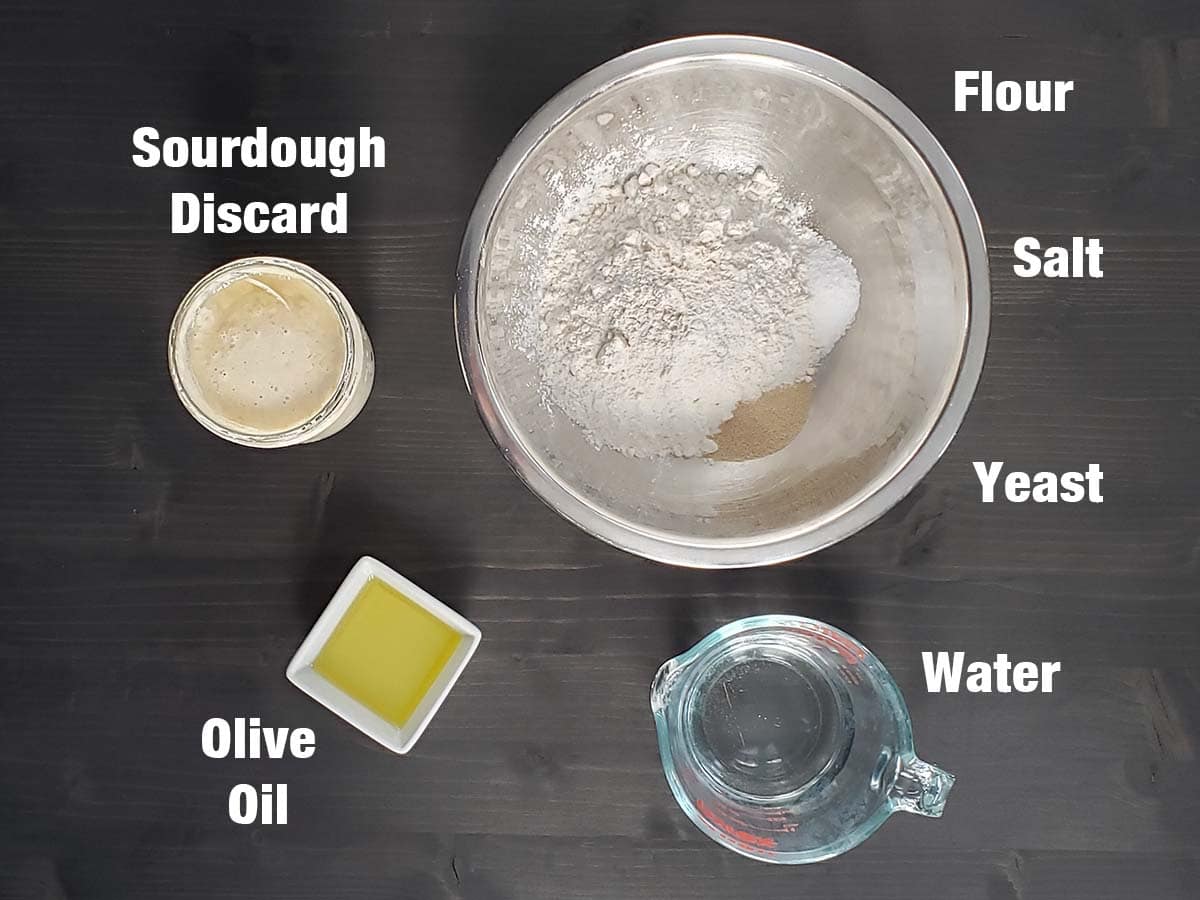
All-Purpose Flour: No special flours are necessary for pita bread. All-purpose flour is perfect. For accuracy, the best way to measure the flour is by using a digital kitchen scale.
Tip: If you don't have a digital scale, spoon the flour into the measuring cup and level it with the back of a butter knife. Try not to compress the flour into the measuring cup.
Salt: I add at least a pinch of salt to all of my recipes. Salt complements and intensifies the other flavors. For all of my recipes, I use Morton Kosher Salt which packs more densely than Diamond Crystal Kosher Salt. If you are using Diamond Crystal Kosher Salt you will want to double the amount of salt you add.
Yeast: Sourdough discard isn't usually strong enough to provide adequate leavening. Adding additional yeast will provide the necessary leavening to help form a pita's signature pocket.
Sourdough Discard: The sourdough discard adds a slight tang to the pita. The older your discard is the tangier it will be. Sourdough discard can be stored in the refrigerator for up to a month.
Over time, the acid will build up breaking down the gluten in your sourdough discard. The discard can still be used, but it will be very acidic with a strong tangy flavor that might be overwhelming.
Pro Sourdough Tip: Keep a glass jar in your refrigerator to store your sourdough discard. Continue adding to it until you have enough to make your chosen sourdough discard recipe.
Are you new to sourdough? I have plenty of information to help you on your sourdough journey.
- How to Create Your Own Micro Sourdough Starter
- Scrapings Method for Sourdough Starter
- How to Dehydrate Sourdough Starter
- Storing Sourdough Starter in the Refrigerator
- Storing Sourdough Starter on the Counter
- Best Containers for Storing Sourdough Starter and Discard
- How Long Does Sourdough Discard Last?
- What is the Difference Between Sourdough Starter and Sourdough Discard?
- Best Gifts for Sourdough Bakers
Water: You will want to use water that is at least 70°F (21°C). I usually shoot for water that is closer to 100°F (40°C) especially in the winter when my kitchen is a little cooler. You could use a thermometer to check the temperature of the water but I usually just dip a finger into water to test the temperature.
The average body temperature is 98.6°F. If the water fills neutral or slightly warm I know I am close to my desired temperature.
Olive Oil: Some recipes don't use any fat. But I find just a little olive oil gives the pita bread a better texture.
See the recipe card for full information on ingredients and quantities.
Step by Step Directions
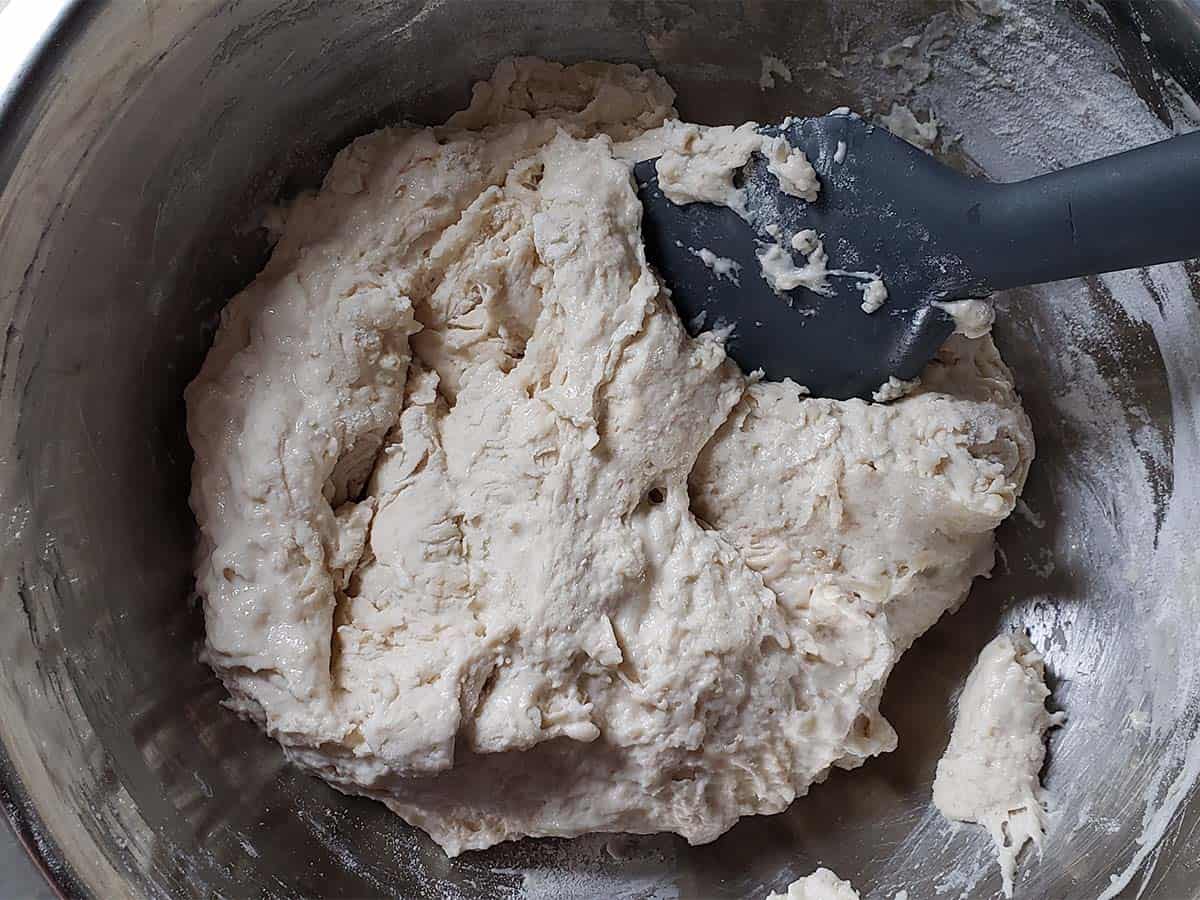
Step 1: In a large bowl, whisk together the flour, salt, and instant yeast. Add the sourdough discard, water, and oil.
Stir with a spatula until a shaggy dough forms.

Step 2: Knead the dough on a lightly floured surface until it is smooth, about 2 minutes.
Why do doughs start out shaggy? When you first begin to mix dough together it has very little gluten developed. The more a dough is mixed and kneaded the more gluten is formed and the smoother the dough becomes.
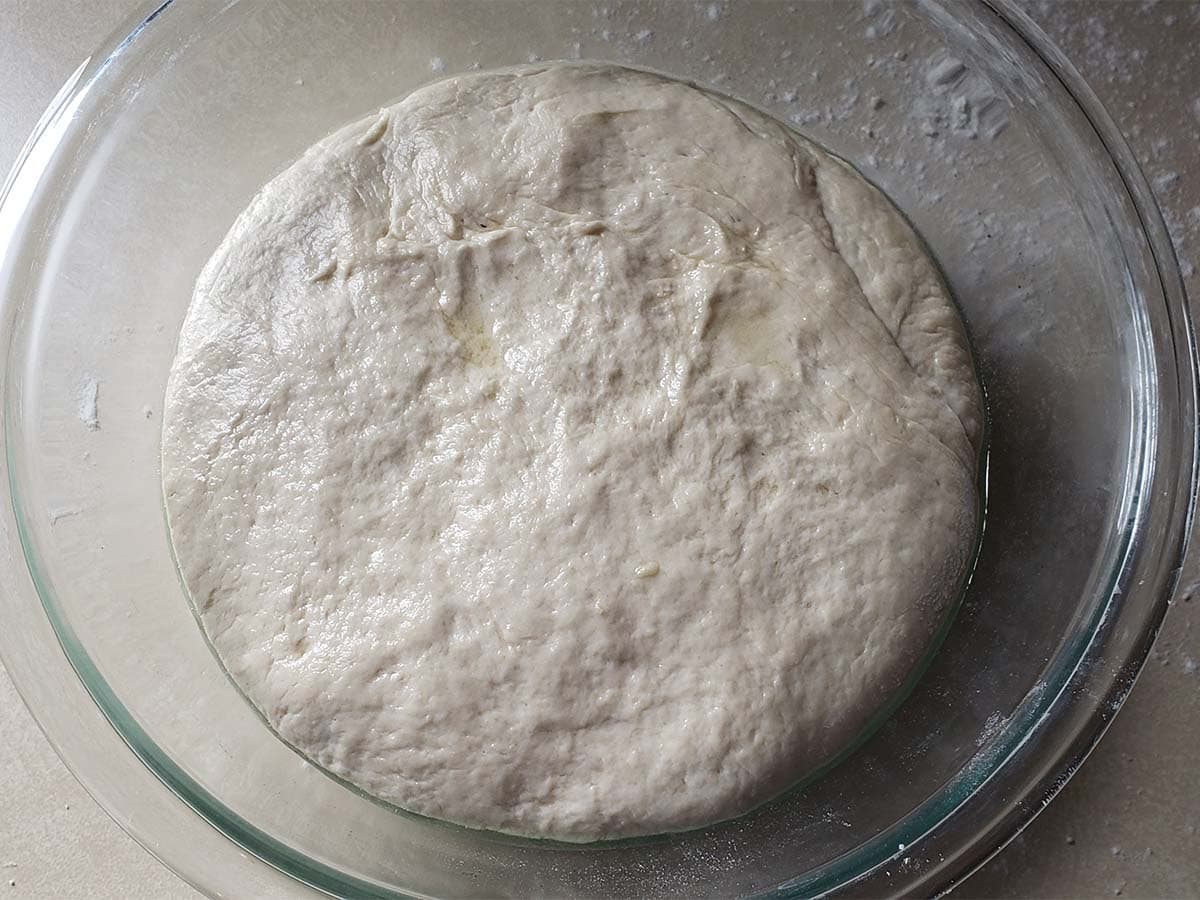
Step 3: Place the dough in a clean bowl and drizzle with a little olive oil, turn the dough to coat. Cover the bowl with plastic wrap or use one of these reusable silicone lids that come in several sizes and stretch to cover a variety of bowls. and leave it in a warm place to rise until the dough has doubled in size, about 1 hour.
Step 4: Place a Cast Iron Skillet or Pizza Stone in the oven and preheat the oven to 550°F (288°C). Cut a sheet of parchment paper into 6 6-inches squares.
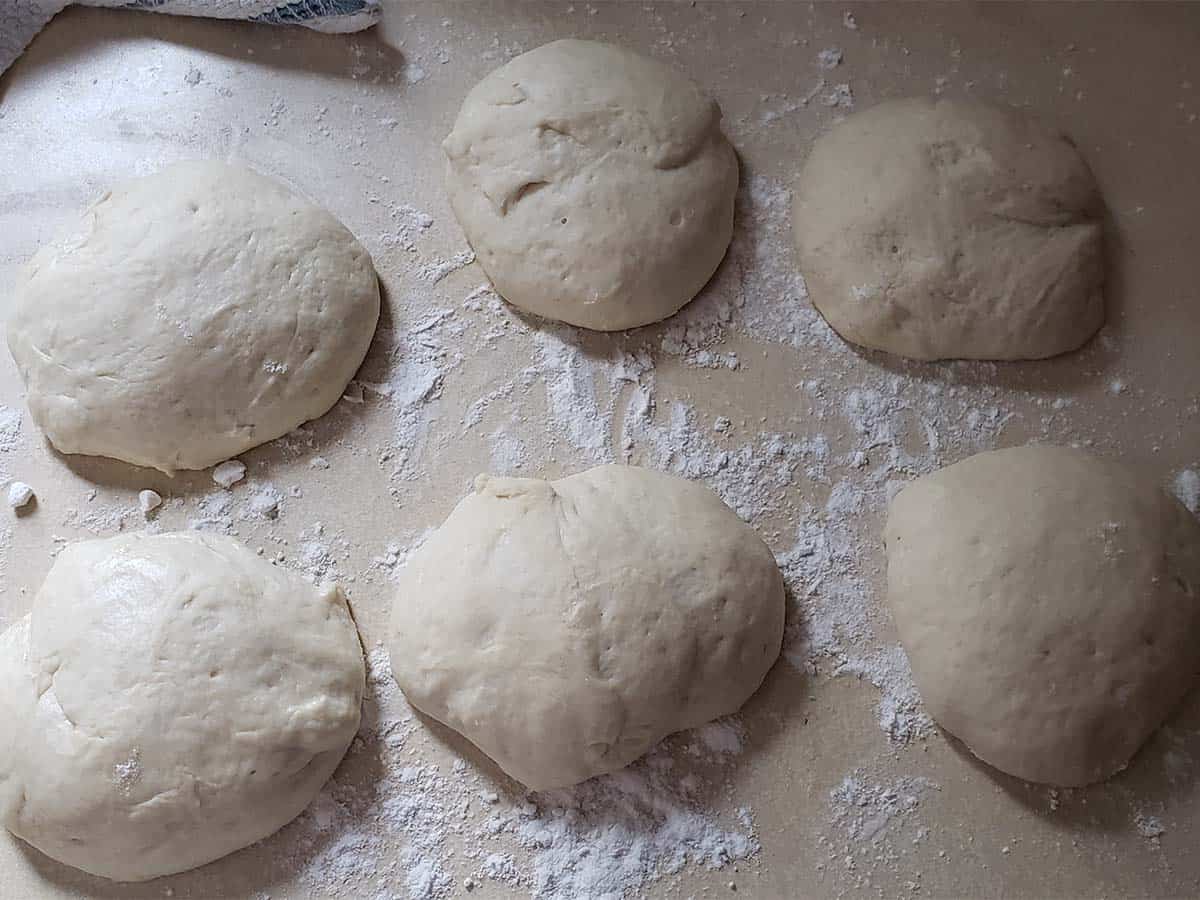
Turn the dough out onto a lightly floured surface and gently punch it down. Divide the dough into 6 equal pieces. Cover the balls of dough with a kitchen towel and let them rest for 30 minutes.
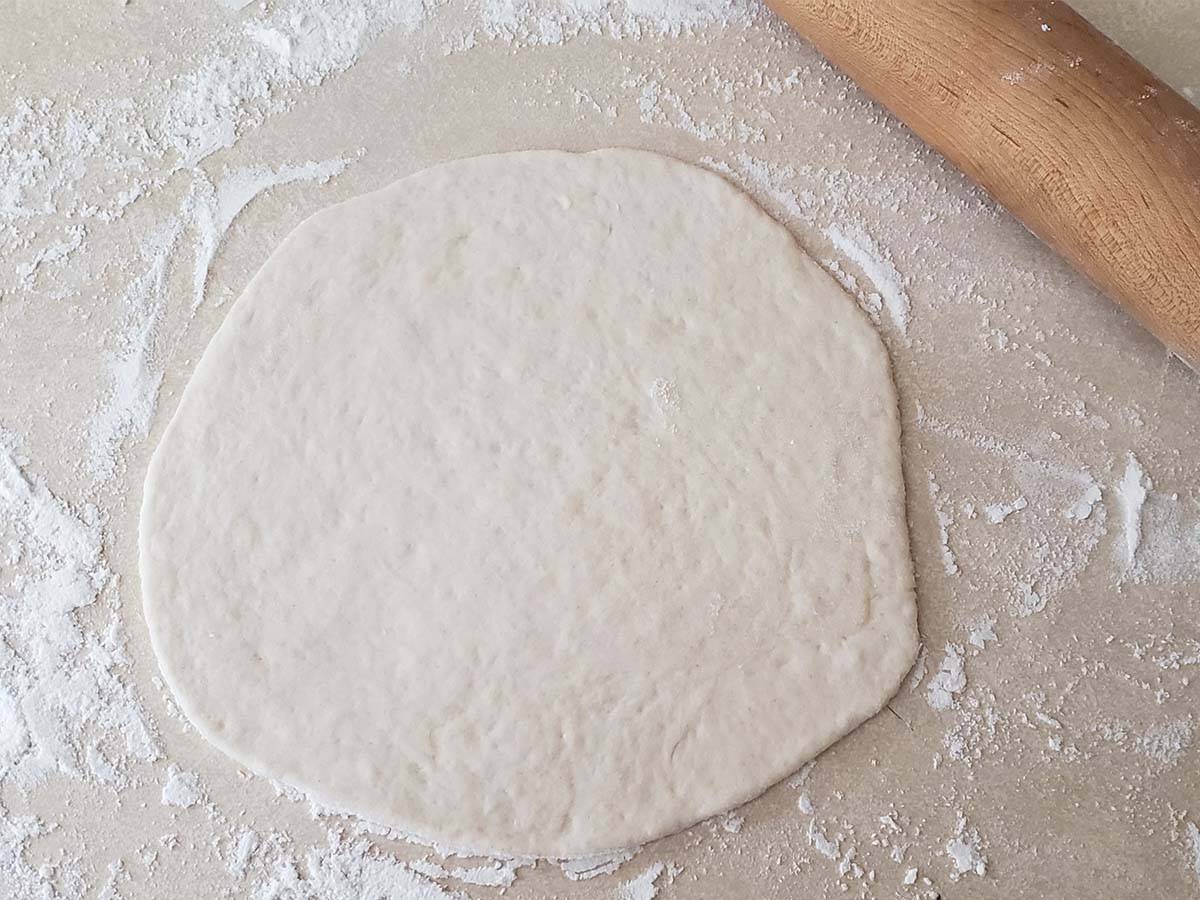
Step 5: Flatten the first ball and using a rolling pin roll it out into a 6-inch circle. When rolling the dough out you want to do so gently to avoid forcing all of the air out. Once you have rolled the dough out transfer it to one of the sheets of parchment paper. Roll the remaining balls out and let them all rest for 15 minutes.
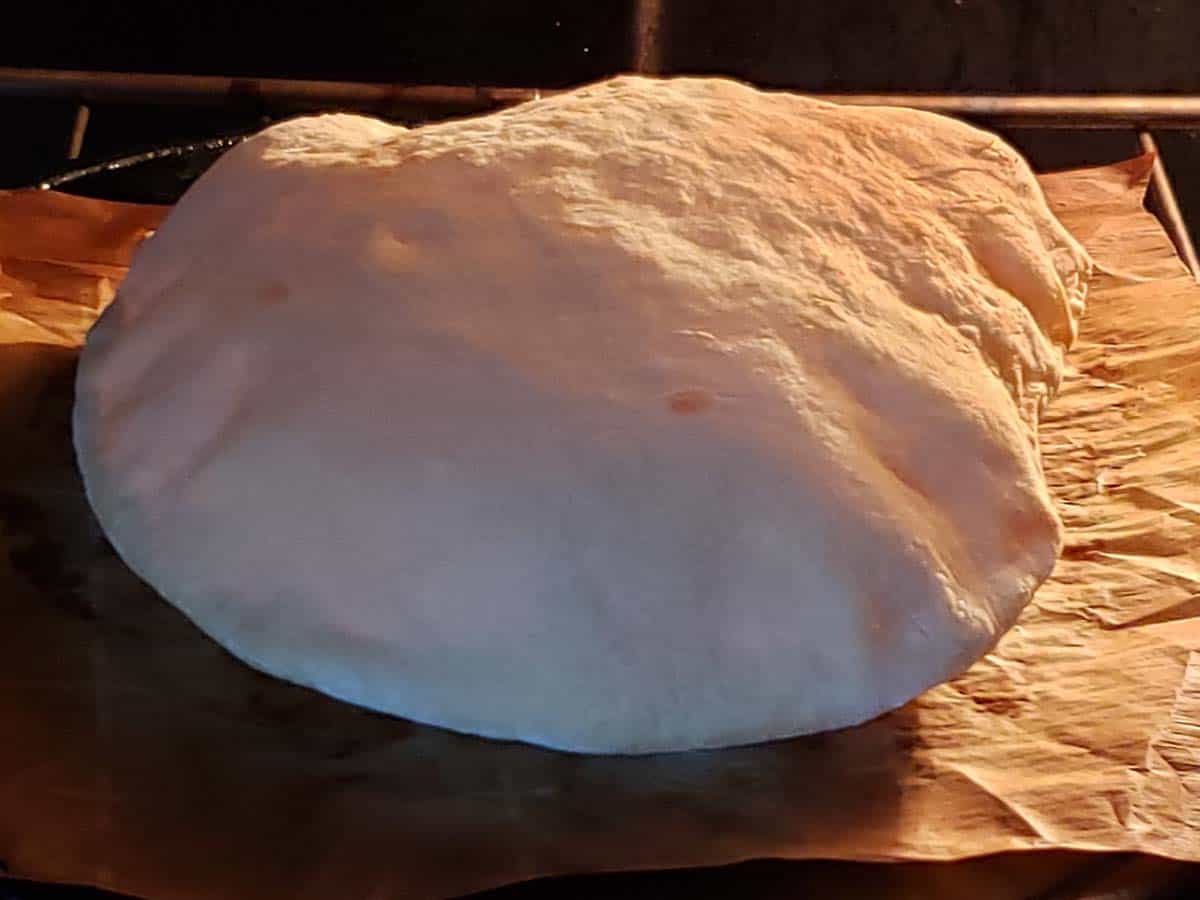
Step 6: Transfer the rounds (parchment paper and all) to your cast iron skillet or pizza stone. The size of your vessel will determine how many you can cook at one time. Bake for 2-3 minutes until golden brown.
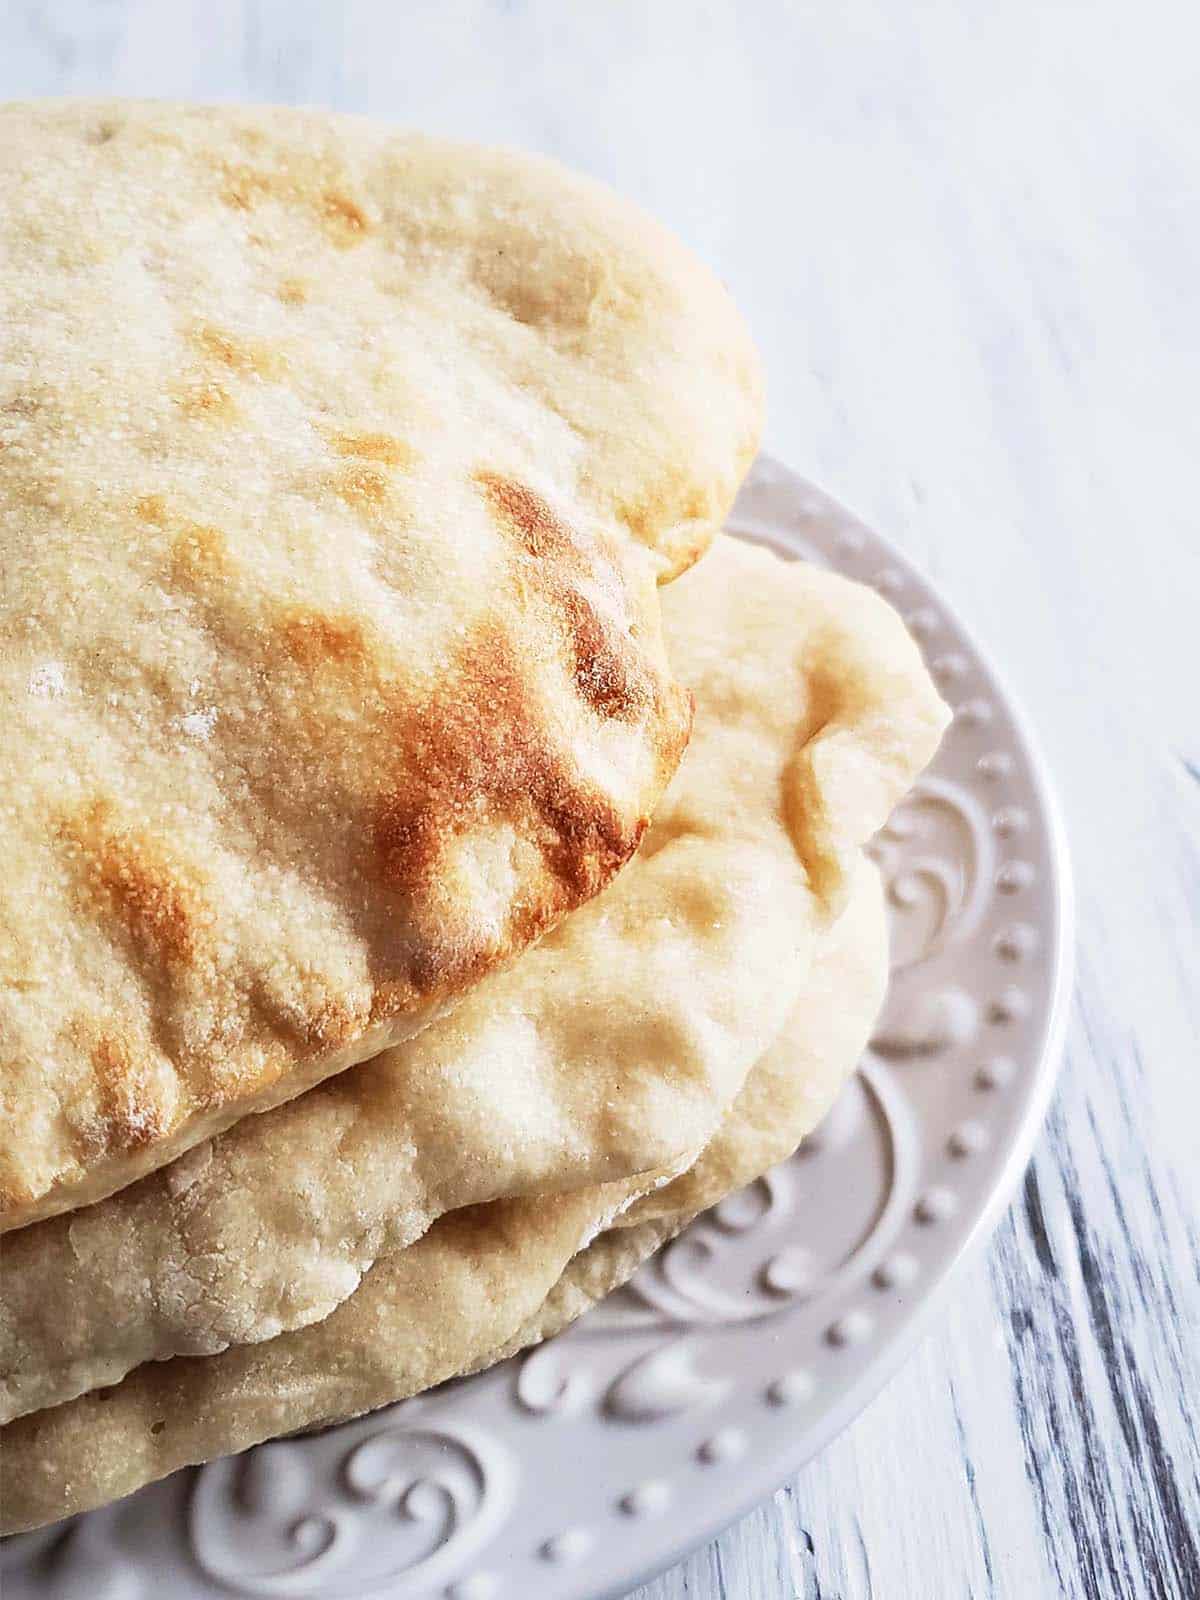
Step 7: Transfer the pitas to a bowl and cover them with a kitchen towel. The steam softens the pitas and gives them the perfect texture. The pita bread will deflate as it cools.
Repeat the baking process with the remaining pitas.
Serving Suggestions
Pita Sandwich: Cut the pitas in half and fill them with your favorite sandwich ingredients.
Pita Chips: Split the pitas to turn them into two single rounds. Brush them with olive oil. Season them with salt or cinnamon and sugar. Slice the rounds into triangular pieces. Place them on a baking sheet in a single layer and bake them in a 450°F (230°C) oven for 5 to 10 minutes.
Serve the pita chips with some Homemade Spinach Pesto or this Maple Bacon Onion Jam.
Storage and Reheating
Pita bread is best eaten on the day it is baked. The older pita bread is the drier it will be.
Pita bread can be stored at room temperature in an airtight container for 3-5 days.
To Freeze: Pita bread can be stored in the freezer in an airtight container for up to three months.
To Reheat: Wrap a single pita in a damp paper towel and microwave on high for fifteen seconds or wrap multiple pitas in foil and bake at 350°F (180°C) for 5-10 minutes.
Recipe FAQs
Yes, after mixing the dough cover the bowl with plastic wrap and store it in the refrigerator for up to a day. The cooler temperatures will slow down the rising process. When you are ready to bake the pita bread remove the dough from the refrigerator and proceed with the remaining instructions.
If your oven is not hot enough or if your sheet pan or baking stone is not preheated there won't be enough steam produced for the pitas to puff. When pitas don't puff up you may overbake them while waiting for them to puff creating tough pitas.
Having thin spots in the pita dough may also cause it to not puff.
As soon as pita bread puffs it is done. Continuing to cook pitas past this point will create tough overcooked pitas.
As the dough rests, the yeast feeds on the sugars found in flour. As they feed, they release chemicals and gases like carbon dioxide and ethanol, which form small bubbles in the dough causing it to rise. When handling and rolling the dough into rounds you want to be careful to preserve as many of these bubbles as possible.
When the dough is placed in a hot oven these bubbles expand rapidly creating a pocked inside of the pita bread.
Pita Bread does not include dairy, uses yeast, may or may not include fat, is baked or heated in a skillet, and has a pocket.
Flatbread often contains dairy and fat, is irregular in shape, has a lightly crisped bubbly exterior, and is traditionally cooked in a tandoor.
Expert Tips
- If your kitchen is chilly, turn your oven on low for about one minute. Turn the oven off and place the bowl of dough inside to rise.
- If you don't have instant yeast, you can substitute active-dry yeast. Simply sprinkle it over the warm water, and let it stand for 15 minutes. Then proceed with the recipe.
- When using a cast iron skillet to bake the pitas, invert it so that you don't have to navigate the sides when moving the pita bread back and forth.
More Sourdough Discard Recipes


Thanks for Reading!
If you try this recipe, let me know! Leave a comment and rate it below! You can also snap a picture and post it on Facebook or Instagram be sure to tag me @RaspberriesandKohlrabi.
Subscribe to get more recipes and tips by email.
📖 Recipe
Sourdough Discard Pita Bread
Equipment
- mixing bowl
- cast iron skillet or pizza stone
- parchment paper
Ingredients
- 2 cups all-purpose flour
- 1 teaspoon kosher salt
- 1 teaspoon instant yeast
- 1 cup sourdough discard
- ½ cup warm water
- 1 tablespoon olive oil
Instructions
- In a large bowl, whisk together the 2 cups all-purpose flour, 1 teaspoon kosher salt, and 1 teaspoon instant yeast. Add the 1 cup sourdough discard, ½ cup warm water, and 1 tablespoon olive oil. Stir with a spatula until a shaggy dough forms. Knead the dough on a lightly floured surface until it is smooth, about 2 minutes.
- Place the dough in a clean bowl and drizzle with a little olive oil, turn the dough to coat. Cover the bowl with plastic wrap, and leave it in a warm place to rise until the dough has doubled in size, about 1 hour.
- Place a cast-iron skillet or pizza stone in the oven and preheat the oven to 550ºF. Cut a sheet of parchment paper into 6 6-inches squares.
- Turn the dough out onto a lightly floured surface and gently punch it down. Divide the dough into 6 equal pieces. Cover the balls of dough with a kitchen towel and let them rest for 30 minutes.
- Flatten the first ball and using a rolling pin roll it out into a 6-inch circle. When rolling the dough out you want to do so gently to avoid forcing all of the air out. Once you have rolled the dough out transfer it to one of the sheets of parchment paper. Roll the remaining balls out and let them all rest for 15 minutes.
- Transfer the rounds (parchment paper and all) to your cast-iron skillet or pizza stone. The size of your vessel will determine how many you can cook at one time. Bake for 2-3 minutes until golden brown. Transfer the pitas to a bowl and cover with a kitchen towel. The steam softens the pitas and gives them the perfect texture. Repeat the baking process with the remaining pitas.


Nicole says
Can I omit the yeast? Perhaps add more starter?
Erica Schramek says
I have not made this recipe without adding yeast. It is written as a sourdough discard recipe, intended to use inactive sourdough discard that may or may not be strong enough to provide the necessary lift. If you want to make sourdough pita bread using your starter, I recommend this recipe: https://www.farmhouseonboone.com/easy-sourdough-pita-bread/ I haven't made them but recipes from her are generally very reliable.
Diane Davis says
Hi can I cook this in a frying pan please or bake in my oven ?
Erica Schramek says
I have only baked them in my oven. I haven't tried them on the stovetop. I am not sure if they would puff up or not.
Sue Richardson says
Why do you say in your introduction that weighing ingredients is best and then, in the recipe, only use cups as a measurement?
Erica Schramek says
If you look next to the ingredients heading in the recipe card at the bottom of the post there is a toggle that will let you switch between US and Metric measurements. While I prefer metric measurements, not everyone does so I provide both.
Margaret says
Thank you. The Pita’s came out perfectly.
Erica Schramek says
I am so happy you liked them!
Janis says
This was my first time making pita bread and it was easy and delicious! My pizza stone held about 4 pitas at a time. The leftovers were equally tasty; I just microwaved for 30 seconds and the pitas were fresh and fluffy again. Thanks for the recipe!
Erica Schramek says
Yay! I am so glad you enjoyed them.
Patty Dailey says
This recipe was perfect in its simplicity and the pita round turned out excellently! Seriously, I impressed myself, lol!
I only wish I could’ve submitted a photo, as they are beautiful. I made smoked chicken gyros for my supper and my pita pocketed perfectly!
Erica says
I am so happy you liked them. If you have any social media you could always post the photo and tag me @raspberriesandkohlrabi. I would love to see them.
Shelby V says
So yummy and easy! My son helped me and we made them with some homemade hummus. Such a good snack. Thanks for an awesome recipe!
Erica says
Yay! I am so happy you liked them and got to make them with your son.
Jessica says
Love love loved this recipe and I won’t look any further. Super easy. I actually forgot about the dough during the rise. It was way over proofed and they still turned out fantastic. Thank you so much. Now I know another discard recipe.
Erica says
Yay! I am so happy you liked them.
Olga says
Hello. The flour & sourdough starter are incorrectly listed in grams. I am reading 240g each but in cups it's 2c flour, 1c starter. Unfortunately, I did not notice until after I mixed equal parts flour and starter in grams. I later weighed the cup of flour and mine was 180g. I suppose I'll see what happens with the mix I have right now. Cheers!
Erica says
Olga, The measurements are correct. 1 cup of sourdough discard is heavier than 1 cup of flour which is why 1 cup of flour weighs 120 grams and 1 cup of sourdough discard weighs 240 grams. For reference, I often use this chart from King Arthur Baking when converting weight measurements to volume measurements. https://www.kingarthurbaking.com/learn/ingredient-weight-chart The fact that 1 cup of flour for you weighed 180g is an example of why weight measurements are more accurate. We all scoop flour differently which is why 1 cup of flour for you may not weigh the same as 1 cup of flour for me.
Olga says
I see what you mean. I also read that there are different 1c sizes out there, ones that hold about 170-180g of flour and to ones that hold up to 200g+. Unsure how accurate that is, which is why I prefer to weigh my ingredients now, just in case. This pita turned out good for me despite the confusion. Thanks!
Erica says
Yes, I have heard that 1 cup sizes vary by country. I have pretty much switched to weight measurements only especially for baking. They are just so much more accurate. I am happy the pitas worked out for you.
Cam says
These pitas are so easy to make and taste great!
I hate to waste the sourdough discard so not I will
make these at least every other week. All 6 puffed up.
I actually flipped them with tongs when there was a minute left.
I also did the inverted cast iron pan with parchment paper.
Thank you for the great recipe.
Erica says
Yay, I am so happy you liked them. I am always amazed every time they puff up.