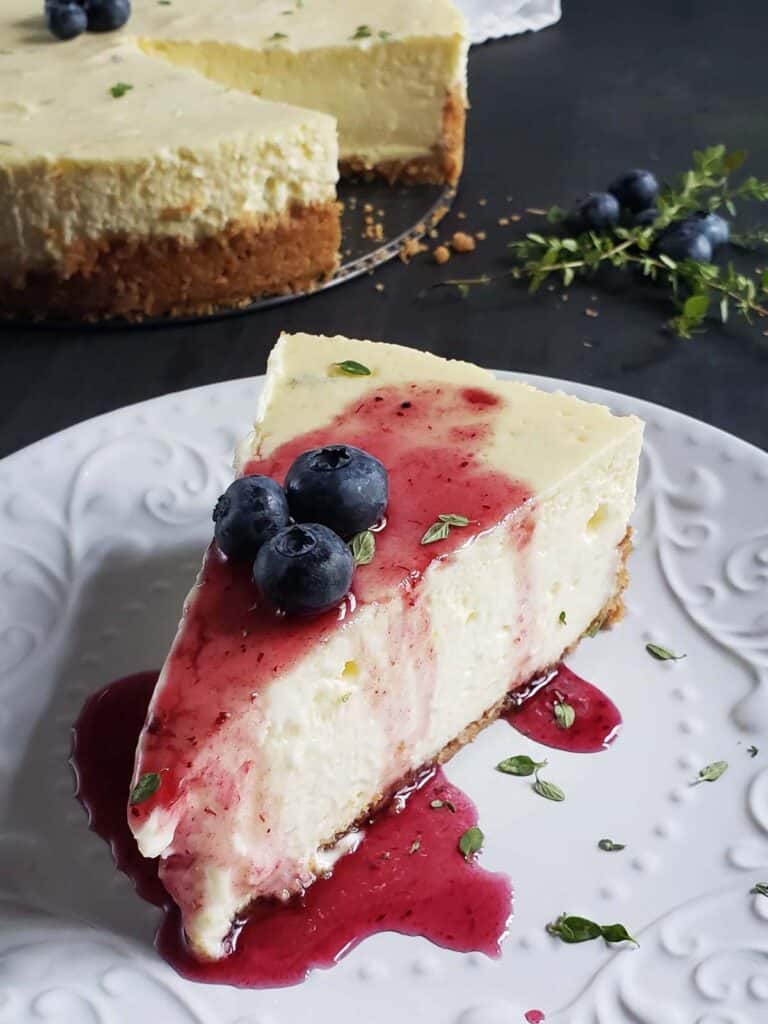
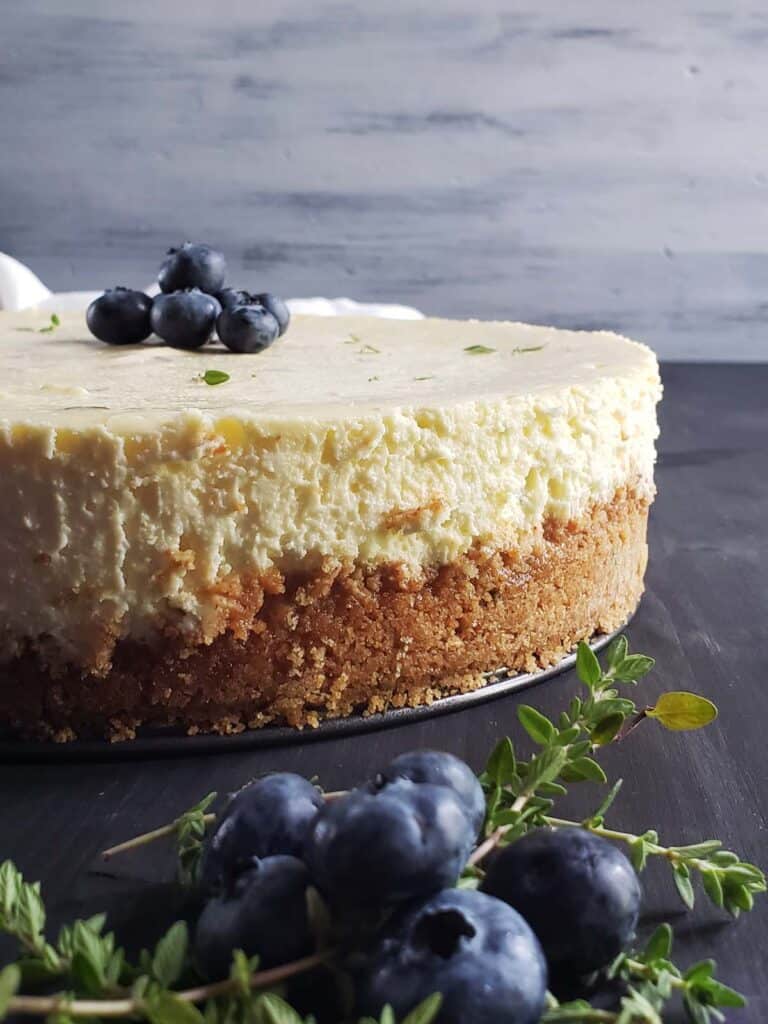
This Lemon Thyme Cheesecake pops with lemon flavor and just a hint of savory thyme along with a crunchy graham cracker crust.
Lemon and fresh thyme pair so well in this cheesecake. I love incorporating fresh herbs into my desserts. I have recipes for Fresh Mint Chocolate Chip Cookies, Blueberry Thyme Scones, and Fresh Mint Brownies.
Making a cheesecake at home may sound intimidating but it doesn't have to be. Cheesecakes are made with simple everyday ingredients and just a little technique and attention to detail.
I've created step-by-step instructions to help you create a delicious perfect cheesecake every time.
Jump to:
Why You Will Love This Recipe
- Cheesecake is a great make-ahead dessert. This Fresh Lemon Thyme Cheesecake can be stored in the refrigerator for 5 to 7 days.
- The addition of lemon provides a zesty and refreshing flavor to the cheesecake, making it a perfect treat for those who enjoy citrusy desserts.
- Thyme adds a subtle herbal aroma that complements the sweetness of the cheesecake. It brings a unique and savory element to the dessert.
- Cheesecake is known for its creamy and velvety texture. The combination of cream cheese, eggs, and other ingredients results in a smooth and luscious dessert experience.
Love cheesecake? You will want to try this Chocolate Chip Pumpkin Cheesecake.
Recipe Ingredients
All ingredients for this Fresh Lemon Thyme Cheesecake should be at room temperature to create a smooth creamy batter. Cold ingredients will result in a lumpy overbeaten cheesecake that may crack as it cools.
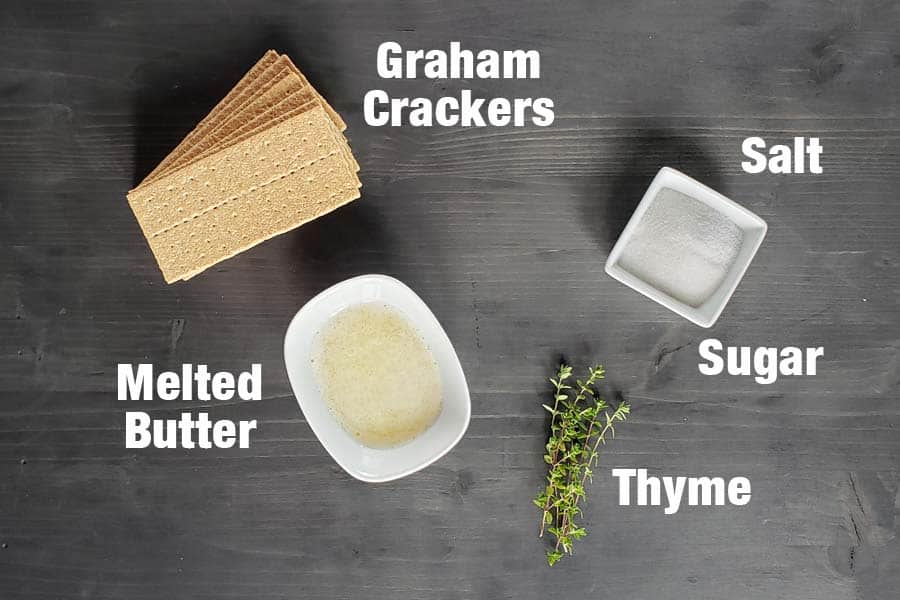
Crust
Graham Crackers: I recommend crushing whole graham crackers rather than buying graham cracker crumbs which I think can taste a bit stale.
Melted Butter: Melted butter helps to hold the crust together and adds a rich buttery flavor.
Fresh Thyme: Thyme has an herbal, grassy, earthy flavor that pairs beautifully with the lemon in this cheesecake. I prefer to use fresh thyme over dried thyme in this recipe. Be sure to remove all of the stems and use just the leaves.
Sugar: You will need just over one cup of white granulated sugar. This cheesecake isn't too sweet allowing the tanginess of the cream cheese and tartness of the lemon to shine through.
Salt: I add at least a pinch of salt to all of my recipes. Salt complements and intensifies the other flavors. For all of my recipes, I use Morton Kosher Salt which packs more densely than Diamond Crystal Kosher Salt. If you are using Diamond Crystal Kosher Salt you will want to double the amount of salt you add.
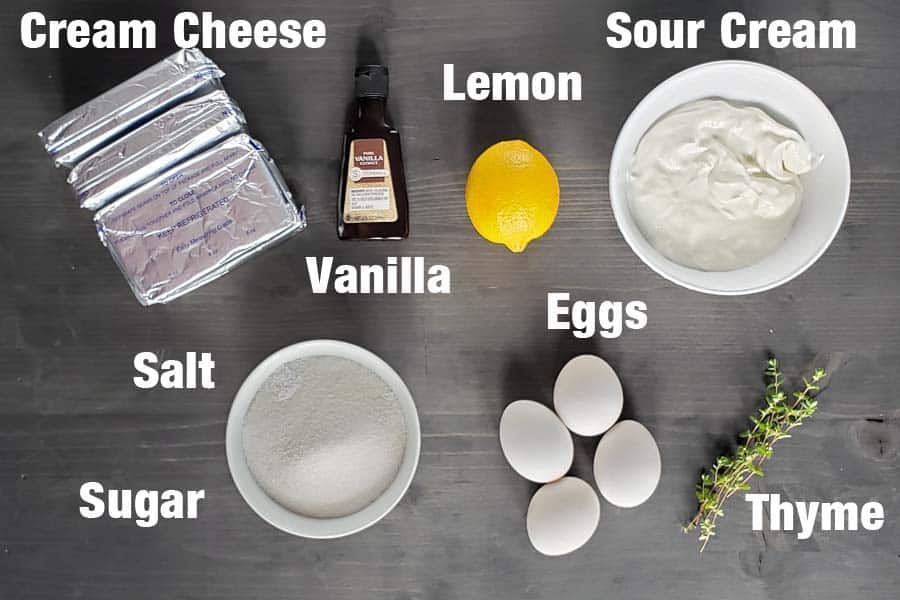
Cheesecake Filling
Cream Cheese: You will need four 8-ounce blocks of cream cheese. I prefer the full-fat variety. Baking a cheesecake isn't the time to start counting calories.
Tip: Make sure you are buying block cream cheese not the whipped cream cheese that is sold in a tub.
Sour Cream: Once again use the full-fat variety. The sour cream creates a smooth texture and boosts the cream cheese tang.
Lemon: Both lemon juice and lemon zest help to brighten the heavy flavor of the cheesecake.
If you love citrus desserts, try this Easy Lemon Curd, Lemon Swiss Meringue, these Sourdough Discard Lemon Poppy Seed Muffins, this No-Bake Pineapple Cream Pie, or these Easy Lemon Cookies.
Eggs: The eggs are the last ingredient to be added to the cheesecake.
See the recipe card for full information on ingredients and quantities.
Step by Step Directions
Step 1: Move the oven rack to the middle of your oven with no racks above it and preheat your oven to 325°F (165°C).
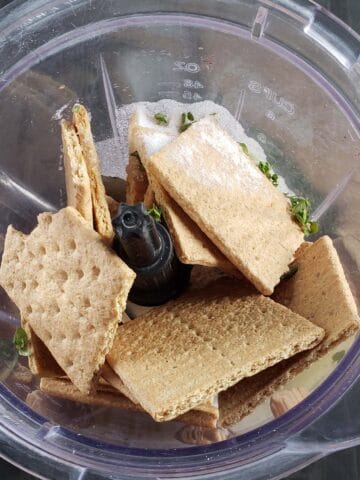
Step 2: Place all of the graham cracker crust ingredients into a food processor or gallon zip-lock bag.
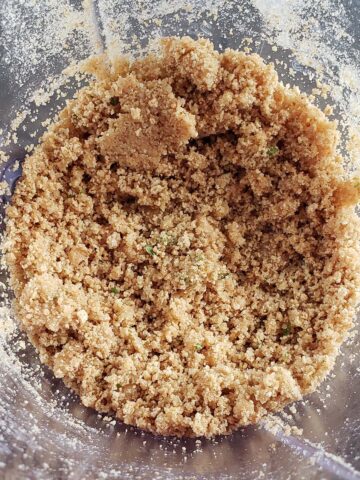
Step 3: Blend or crush the ingredients until they resemble coarse sand.
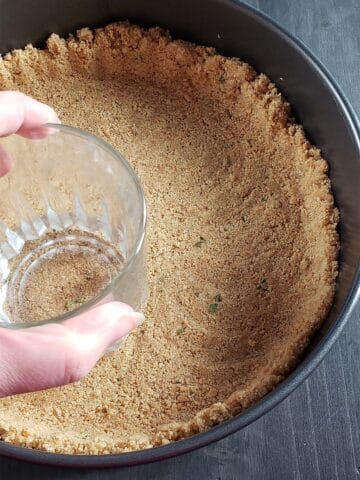
Step 4: Stir in the melted butter until it resembles wet sand. Pour the graham cracker mixture into the bottom of a 9-inch springform pan.
Press the graham cracker mixture into an even layer using a flat-bottomed glass or measuring cup. Cover the bottom of the pan and about 2 inches up the sides.
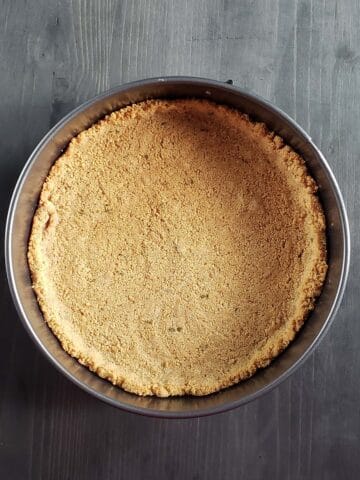
Step 5: Bake the graham cracker crust for 10-12 minutes until fragrant and lightly browned.
Remove from the oven and allow the crust to cool while you make the filling.
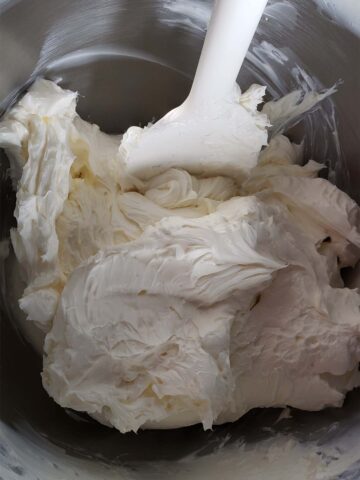
Step 6: Using a handheld mixer or stand mixer and the paddle attachment, beat the cream cheese on low speed until creamy, about 1 ½ minutes, scraping down the sides of the bowl after about 1 minute.
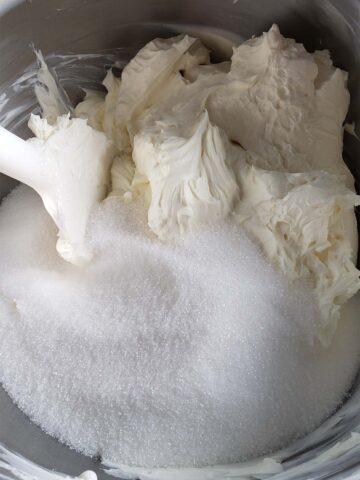
Step 7: Add the sugar and mix on medium-low speed until smooth and creamy about 1 minute.
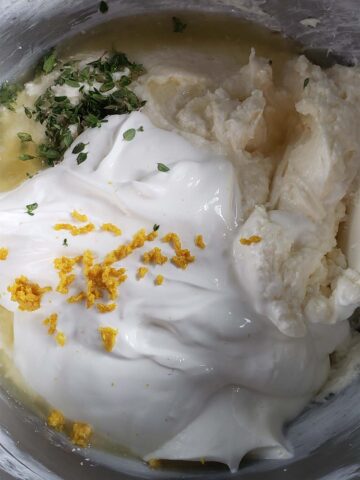
Step 8: Scrape down the sides of the bowl and add the sour cream, thyme, lemon juice and zest, vanilla extract, and salt. Mix on medium-low speed until smooth and creamy about 1 minute.
Scrape down the bowl if there are lumps continue mixing until smooth.
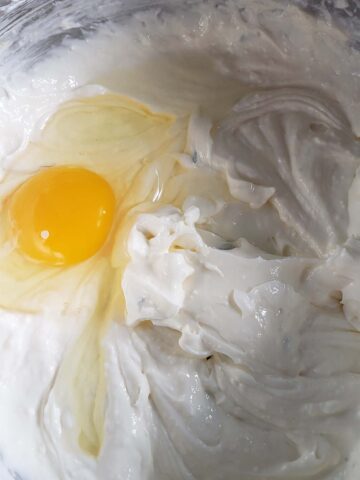
Step 9: Add the eggs one at a time, beating at low speed after each addition until just blended. When the final egg has been mixed in, turn the mixer off.
Tip: Be careful to not overmix the batter once the eggs have been added. Overmixing will incorporate too much air into the batter causing the cheesecake to crack as it cools.
Step 10: Boil at least 4 cups of water. You can either boil the water in the microwave, on the stovetop, or my favorite way in an electric kettle. You will need 1 inch of water in your roasting pan for the water bath. I typically use an entire kettle full of hot water.
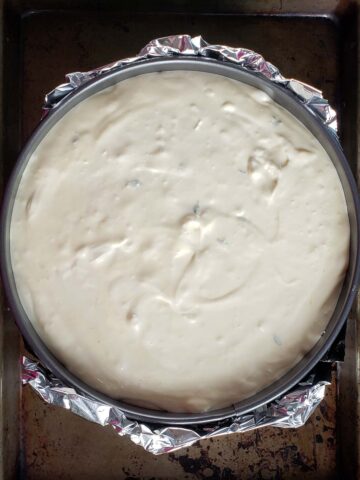
Wrap the bottom of your springform pan with several layers of heavy-duty foil.
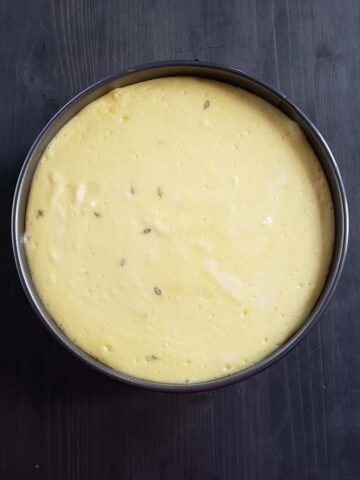
Pour the cheesecake filling over the cooled crust. Use a rubber spatula to smooth it into an even layer.
Place the filled springform pan in the larger cake or roasting pan.
Set the pans on the middle rack of the oven. Carefully pour the boiling water into the larger pan until it is about 1 inch deep. Close the oven door.
Step 11: Bake the cheesecake for 50-55 minutes. The top of the cheesecake should look set but not browned. When you wiggle the pan the cheesecake should wobble not jiggle. To me, wobbling means the whole cheesecake moves together when wiggled. Jiggling is when individual ripples move across the top of the cheesecake.
To prevent cracking, we want to cool the cheesecake slowly. Turn the oven OFF and allow the cheesecake to continue baking for 15 minutes.
Crack open the oven door about an inch (holding it open with a wooden spoon if needed) and allow the cheesecake to cool slowly for 45 minutes.
Tip: Wrapping your springform pan in foil will help prevent water from seeping into your cheesecake.
Step 12: Remove the cheesecake from the oven and set it on a cooling rack. Remove the foil and run a thin knife around the edge to release the cheesecake from the pan.
Allow the cheesecake to cool at room temperature for an hour. Cover the pan with foil and refrigerate for at least four hours or overnight.
When you are ready to serve, unlatch the springform pan and remove the sides. Cut the cheesecake into 12 slices.
Tip: For neater slices wipe the knife clean and dip into warm water between each slice.
Topping
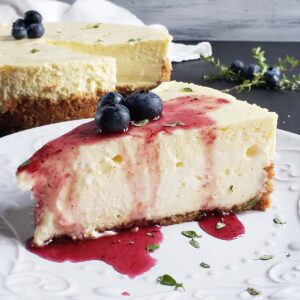
This Fresh Thyme and Lemon Cheesecake is delicious on its own. My favorite way to serve it is topped with Homemade Small-Batch Blueberry Jam or this Roasted Balsamic Strawberry Jam.
Storage and Freezing Instructions
Storage: Cheesecake needs to be stored in the refrigerator. To refrigerate reattach the springform ring to the base and cover the top with aluminum foil. Cheesecake can be refrigerated for 5-7 days.
To freeze a whole cheesecake:
- Allow the cheesecake to cool completely before freezing.
- Remove the outer rim of the cheesecake. You can either leave the cheesecake on the bottom pan or carefully transfer it to a cardboard cake round or large plate.
- Do not freeze cheesecake with any toppings. Add the toppings later when serving cheesecake.
- Wrap the cheesecake and base with several layers of plastic wrap. Wrap in a final layer of heavy-duty aluminum foil.
- Cheesecake can be frozen for up to three months. Thaw the cheesecake in the refrigerator overnight.
To freeze individual cheesecake slices:
- Slice the cheesecake and transfer each slice to a parchment paper-lined baking sheet. Place the baking sheet in the freezer until the cheesecake slices have frozen solid, about one to two hours.
- Do not freeze cheesecake with any toppings. Add the toppings later when serving cheesecake.
- Wrap each slice of cheesecake with several layers of plastic wrap. Place the cheesecake slices in a zip-top bag labeled with the date and contents.
- Cheesecake can be frozen for up to three months. Thaw the cheesecake in the refrigerator overnight.
Recipe FAQs
Creamy ingredients like cream cheese and sour cream create a creamy cheesecake. It is also important for all of the ingredients to be at room temperature. Room-temperature ingredients will be easier to incorporate creating a smooth batter without overmixing.
Overmixing a cheesecake incorporates too much air into the batter causing it to expand and puff as it bakes. As the cheesecake cools, all of those air bubbles will burst causing the cheesecake to fall and crack
A bain-marie is simply a fancy term for a hot water bath. Hot water baths are used to cook delicate custards like cheesecake or this Blueberry Creme Brulee. The insulation and steam from the water provide a gentle heat that cooks the cheesecake slowly and gently. This slow gentle cooking helps to prevent cracking and sinking as the cheesecake cools.
The top of the cheesecake should look set but not browned. When you wiggle the pan the cheesecake should wobble not jiggle. To me, wobbling means the whole cheesecake moves together when wiggled. Jiggling is when individual ripples move across the top of the cheesecake.
The good news is even a cracked cheesecake still tastes amazing. If your cheesecake does crack simply cover the cracks with a delicious fruit topping or top with some freshly made whipped cream.
Expert Tips
- Use room temperature ingredients. They will blend more easily and create a smoother cheesecake.
- Once the eggs have been added, do not overmix the cheesecake filling. Overmixing will incorporate too much air causing the cheesecake to deflate and crack as it cools.
- Wrap your springform pan with foil. I'd like to believe my springform pans will never leak but I am not willing to risk a soggy cheesecake crust to find out.
- Bake the cheesecake in a water bath. A water bath creates gentle heat which bakes the cheesecake slowly and evenly.
- Baking times for all recipes are only suggestions. The actual baking time will vary depending on your oven. It is helpful to know your oven and worth purchasing an inexpensive oven thermometer. Oven temperatures can vary as much as 50 degrees plus or minus.
- Allow the cheesecake to cool slowly. Going from a hot oven to a cool kitchen could cause the cheesecake to crack.
- Run a sharp knife between the cheesecake and the inside of the springform pan before releasing the tension clasp. This will release the cheesecake from the pan.
More Dessert Recipes


Thanks for Reading!
If you try this recipe, let me know! Leave a comment and rate it below! You can also snap a picture and post it on Facebook or Instagram be sure to tag me @RaspberriesandKohlrabi.
Subscribe to get more recipes and tips by email.
📖 Recipe
Fresh Lemon Thyme Cheesecake
Equipment
- 9 inch spring form pan
- large roasting pan
Ingredients
Crust
- 1 sleeve graham crackers
- 2 tablespoons white granulated sugar
- 1 tablespoon fresh thyme
- ⅛ teaspoon kosher salt
- 5 tablespoons unsalted butter melted
Cheesecake
- 32 oz cream cheese room temperature
- 1 cup granulated white sugar
- 1 ⅓ cup sour cream room temperature
- 1 tablespoon fresh thyme
- 1 lemon zest and juice
- 1 teaspoon vanilla extract
- ⅛ teaspoon kosher salt
- 4 large eggs room temperature
Instructions
Crust
- Move the oven rack to the middle of your oven with no racks above it and preheat your oven to 325°F (165°C).
- Blend or crush the ingredients until they resemble coarse sand.
- Stir in the melted 5 tablespoons unsalted butter until it resembles wet sand. Pour the graham cracker mixture into the bottom of a 9-inch springform pan.
- Press the graham cracker mixture into an even layer using a flat-bottomed glass or measuring cup. Cover the bottom of the pan and about 2 inches up the sides.
- Bake the graham cracker crust for 10-12 minutes until fragrant and lightly browned.
- Remove from the oven and allow the crust to cool while you make the filling.
Cheesecake Filling
- Using a handheld or stand mixer and the paddle attachment, beat the 32 oz cream cheese on low speed until creamy, about 1 ½ minutes, scraping down the sides of the bowl after about 1 minute.
- Add the 1 cup granulated white sugar and mix on medium-low speed until smooth and creamy about 1 minute.
- Scrape down the sides of the bowl and add the 1 ⅓ cup sour cream, 1 tablespoon fresh thyme, lemon juice and zest, 1 teaspoon vanilla extract, and ⅛ teaspoon kosher salt. Mix on medium-low speed until smooth and creamy about 1 minute.
- Scrape down the bowl if there are lumps continue mixing until smooth.
- Add the 4 large eggs one at a time, beating at low speed after each addition until just blended. When the final egg has been mixed in, turn the mixer off.
Baking
- Boil at least 4 cups of water. You will need 1 inch of water in your roasting pan for the water bath. I typically use an entire kettle full of hot water.
- Wrap the bottom of your springform pan with several layers of heavy-duty foil.
- Pour the cheesecake filling over the cooled crust. Use a rubber spatula to smooth it into an even layer.
- Place the filled springform pan in the larger cake or roasting pan.
- Set the pans on the middle rack in the oven. Carefully pour the boiling water into the larger pan until it is about 1 inch deep. Close the oven door.
- Bake the cheesecake for 50-55 minutes until the top of the cheesecake looks set but not browned. The cheesecake should wobble slightly when jiggled.
- Turn the oven OFF and allow the cheesecake to continue baking for 15 minutes.
- Crack open the oven door about an inch (holding it open with a wooden spoon if needed) and allow the cheesecake to cool slowly for 45 minutes.
- Remove the cheesecake from the oven and set it on a cooling rack. Remove the foil and run a thin knife around the edge to release the cheesecake from the pan.
- Allow the cheesecake to cool at room temperature for an hour. Cover the pan with foil and refrigerate for at least four hours or overnight.
- When you are ready to serve, unlatch the springform pan and remove the sides. Cut the cheesecake into 12 slices. For neater slices wipe the knife clean and dip into warm water between each slice.


Comments
No Comments